
Do you want to advertise your product or service with Google Ads but don’t know how to get started? No problem, Sven Scheuerle explains step by step how to set up your first campaign and reach your target group with Google advertising.
Have you ever wondered why only large shops come up in the first few searches on Google? Especially when you search for things that you can buy online. This is simply because these companies usually place adverts on Google.
To be more precise, this is the Google Ads service, which can be used to place adverts for a very specific search query or “keyword”. Until 2018, this service was still called Google AdWords, which is why the terms “Google Ads” and “Google AdWords” are often used interchangeably.
For example, a Google advert looks like this in the search results:
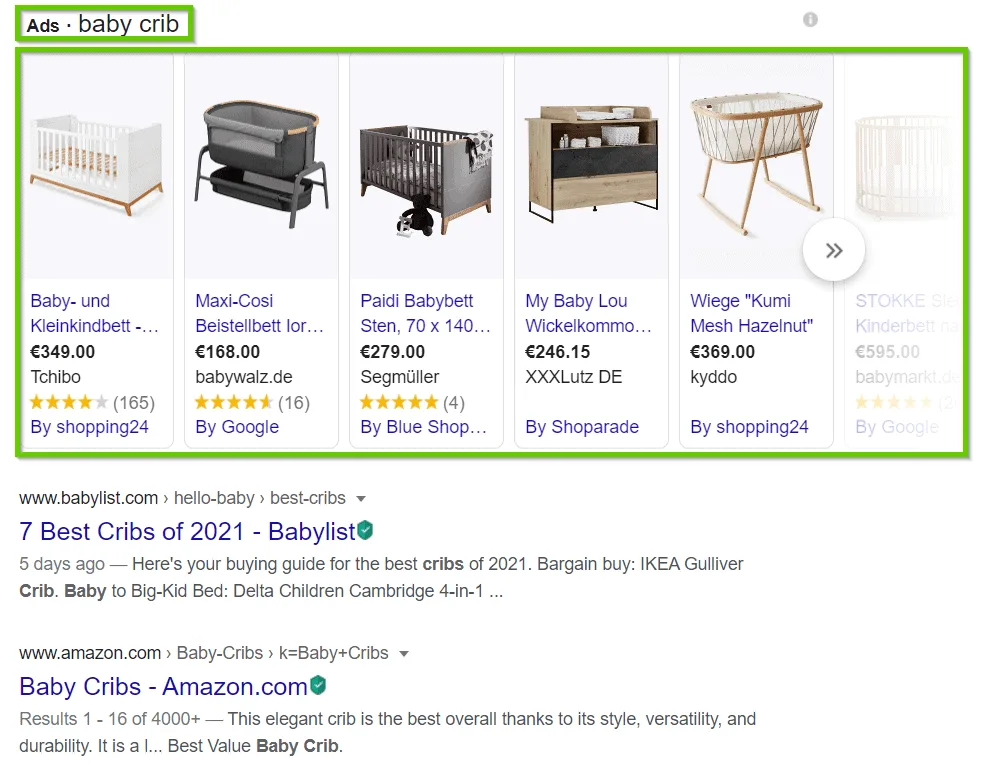
In this article, I would like to explain to you in very simple steps how you can use this for your online shop or service. The big advantage of Google advertising is that you can place your offer immediately in the search results pages (SERPs).
What are Google Ads anyway?

As you may already know, you have two options for appearing among the top rankings in Google search results. When we talk about the top rankings, we generally mean page 1 of the search results.
- On the one hand, you can use organic optimisation, i.e. classic search engine optimisation (SEO for short), which is made up of on-page optimisation and off-page optimisation.
- The second option is search engine advertising (SEA for short), which allows you to be placed in the search results for very specific keywords.
And what does SEM mean?
The term “search engine marketing” (SEM for short) is generally used as a generic term for SEO and SEA measures. You can find a helpful definition of the term in the Ryte Wiki.
Search engine advertising is charged per click. Important to know: The so-called CPC value (cost per click) can differ from keyword to keyword. You can get a good overview of the approximate click prices from a keyword search and the Google AdWords keyword planner, for example. More on this in a moment.
Upselling, cross-selling & measuring success
Discover how to effectively measure and boost cross-selling opportunities with actionable strategies tailored for agencies and freelancers on the Raidboxes blog.
Your first Google Ads campaign in 2 steps
You can create your first Google Ads campaign in just two steps. I will show you the settings you need to make in the corresponding configurations in the following example.
1. keyword research
Before you start a Google Ads campaign, you should carry out detailed keyword research. You can either do this directly with the keyword planner within Google AdWords or, of course, with another tool such as Ubersuggest.
The main purpose of keyword research in the first step is to find keywords that are searched for by your target group. And to find out how high the competition is and how high the click prices are. You can of course repeat the keyword research at a later date and add or remove the relevant keywords. Over the course of your campaign, you can also see exactly how and in what form users are searching for your keywords.
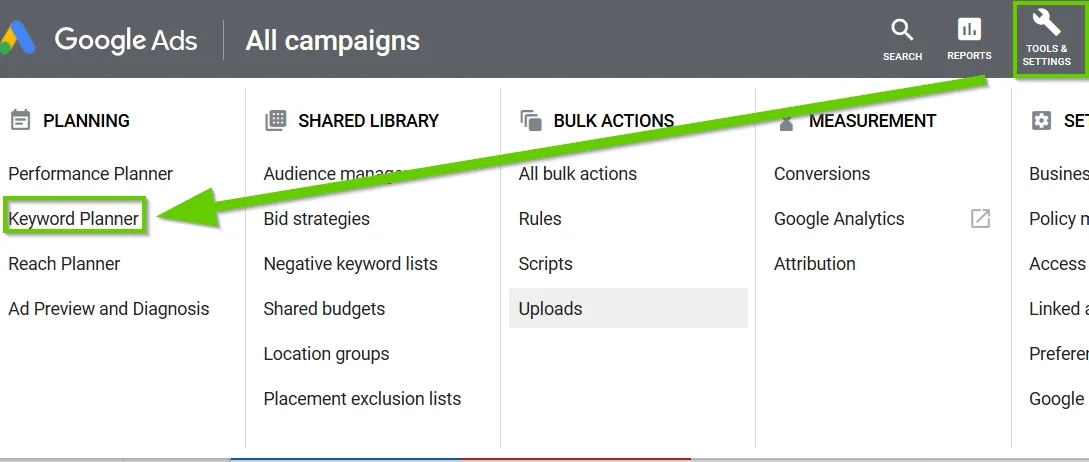
To access the Keyword Planner in Google Ads, click on “Keyword Planner” under “Tools and settings“.
In the following overview, click on “Discover new keywords” to view general information about your keyword.

You can then enter your main keyword here. In our example, I will simply use the keyword “baby crib”.

You could of course also enter other relevant keywords here. Then click on the “Show results” button. In the following overview, you will then see the results for the keyword you entered previously. All keywords that are also related to your keyword (e.g. long tail keywords, synonyms, etc.) are displayed here.
You can refine your keyword search again on the right-hand side under “Optimise keywords”.
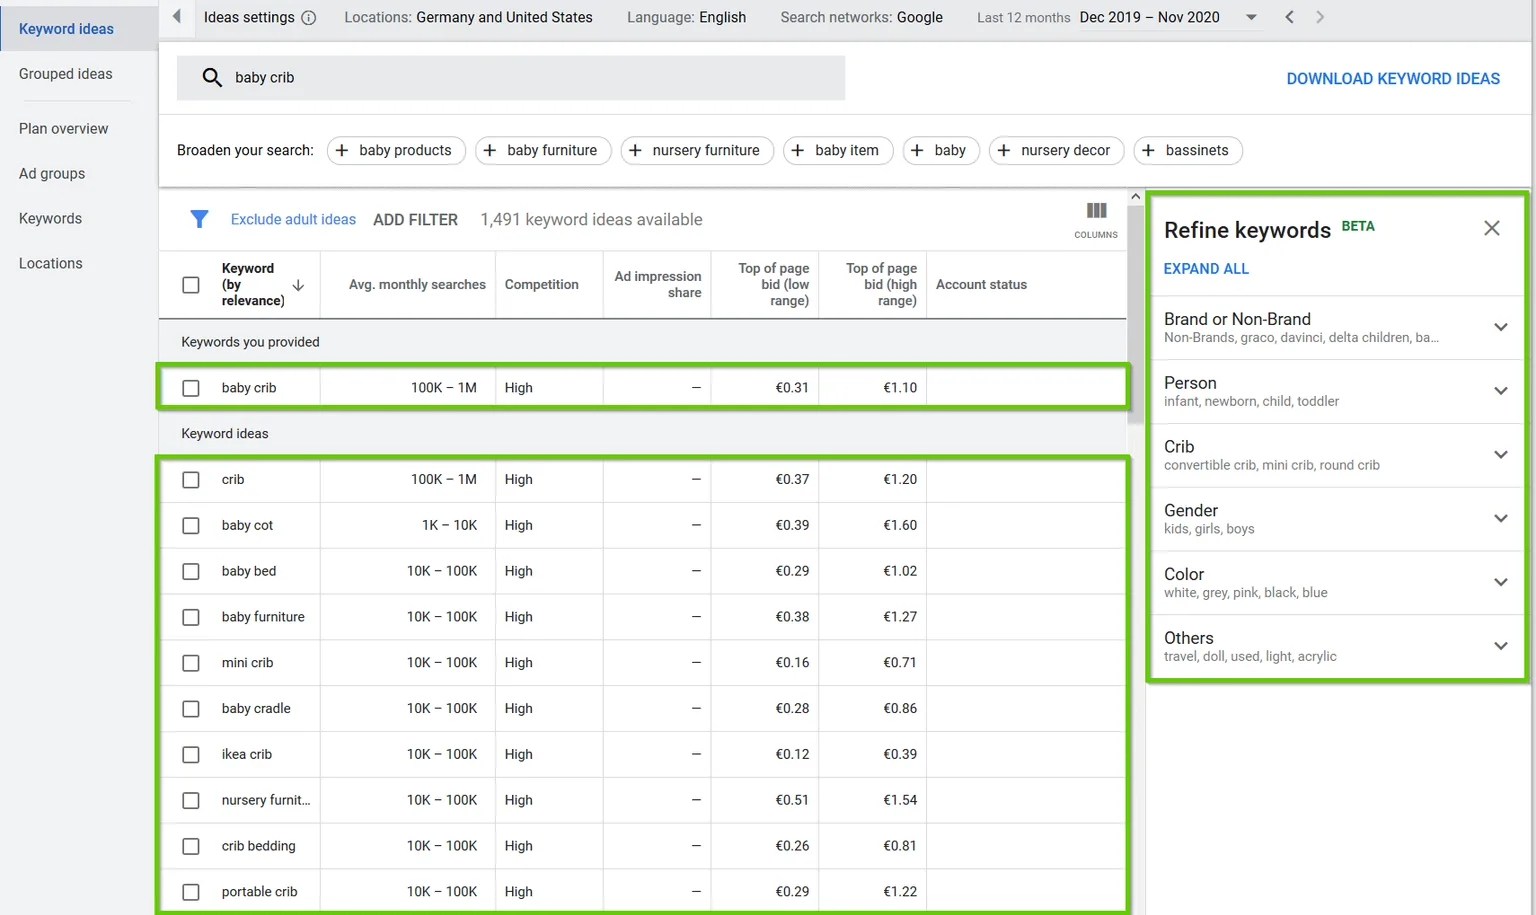
In the individual columns you can see, among other things, the approximate monthly search queries, the competition and the most favourable and most expensive click price in this area. You can add this directly to a new or existing campaign by ticking the relevant keyword.
I personally recommend that you don’t rely exclusively on the Keyword Planner, but always use another keyword tool in parallel. Unfortunately, the Keyword Planner only provides inaccurate data for some key figures, such as search volume, and is somewhat difficult to use for beginners.
Alternatively, you can also carry out keyword research with a tool such as Ubersuggest, which provides much clearer results.

As you can see, a keyword tool such as Ubersuggest provides much clearer results at first glance, which are easier to work with, especially for beginners. Here you can also see your main keyword and other related keywords. In addition, a current trend, the search volume, the click price (CPC), the competition in paid advertising (PD) and the level of competition in organic search (SD). The higher the value, the more difficult.
The keyword research gives you an initial overview of keywords that you can use in Google Ads. The more precise and longer the keyword, the more favourable the click prices – and the lower the search volume.
For example, if you only offer beds measuring 70 x 140 (keyword: baby bed 70×140) or would like to advertise this category from your online shop, you should start your campaign with this keyword. To compete with the competition in the most popular keyword “baby bed” would simply be too general and you would burn a lot of money.
2. create campaign
Once you have done your keyword research, the next step is to create a campaign.
To do this, click on “Campaign” and then on the “+” symbol and create a “New campaign“.

In the following overview, you must then select the target project for your campaign. There are a number of options available to you here:.
- Sales: Achieve sales or conversions / address customers who are about to make a purchase decision
- Leads: Relevant users who are interested in the product or service and are persuaded to take a specific action (conversion)
- Traffic to website: Get potential customers to visit your website.
- Product & brand readiness to buy: Encourage users to find out more about your product or service
- Brand awareness & reach: Increase awareness of the brand, the service, the product, the company
- App advertising: Increase the number of app installations and interactions
- Local shop visits and promotions: Increase visits to local shops
- Create a campaign without a target project: Other
In our example, we want to ensure that we sell our product (baby cot). For this reason, we select “Sales” here.

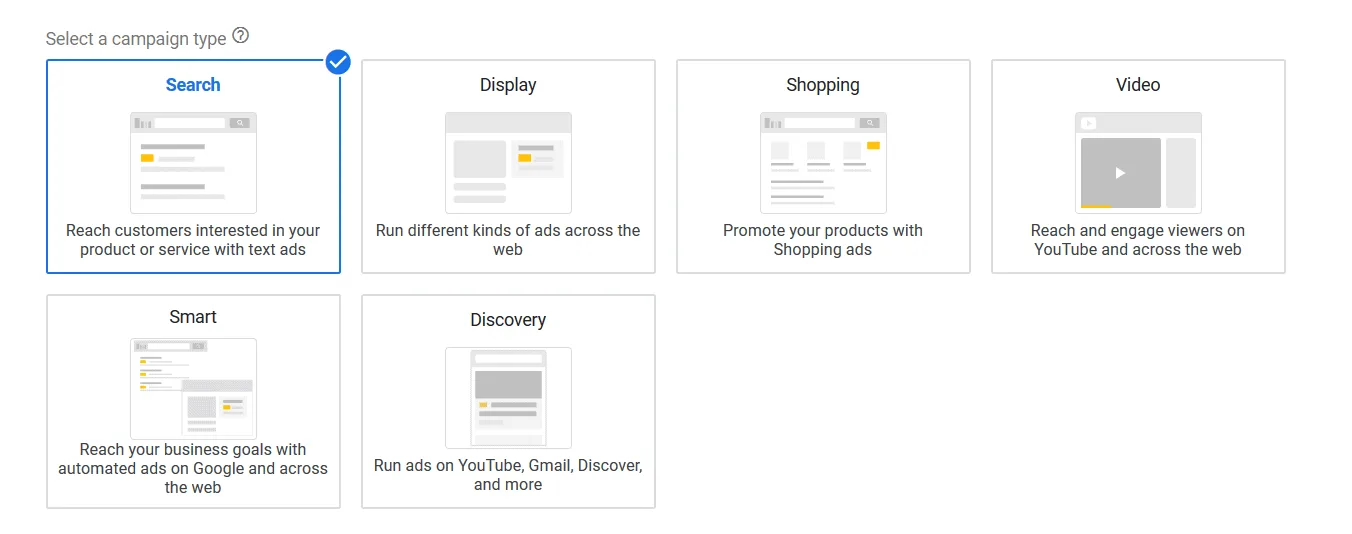
Clicking on the respective campaign target opens another window in which you can now specify the campaign type.
- Search
- Display
- Shopping
- Video
- Smart
- Discovery
Here we select “Search” – i.e. a text advert within the search results – and click on the “Next” button. You will then be taken to the campaign settings. (You can find out when you should select which target project and what type of ad it is suitable for in the Google Help Centre ).
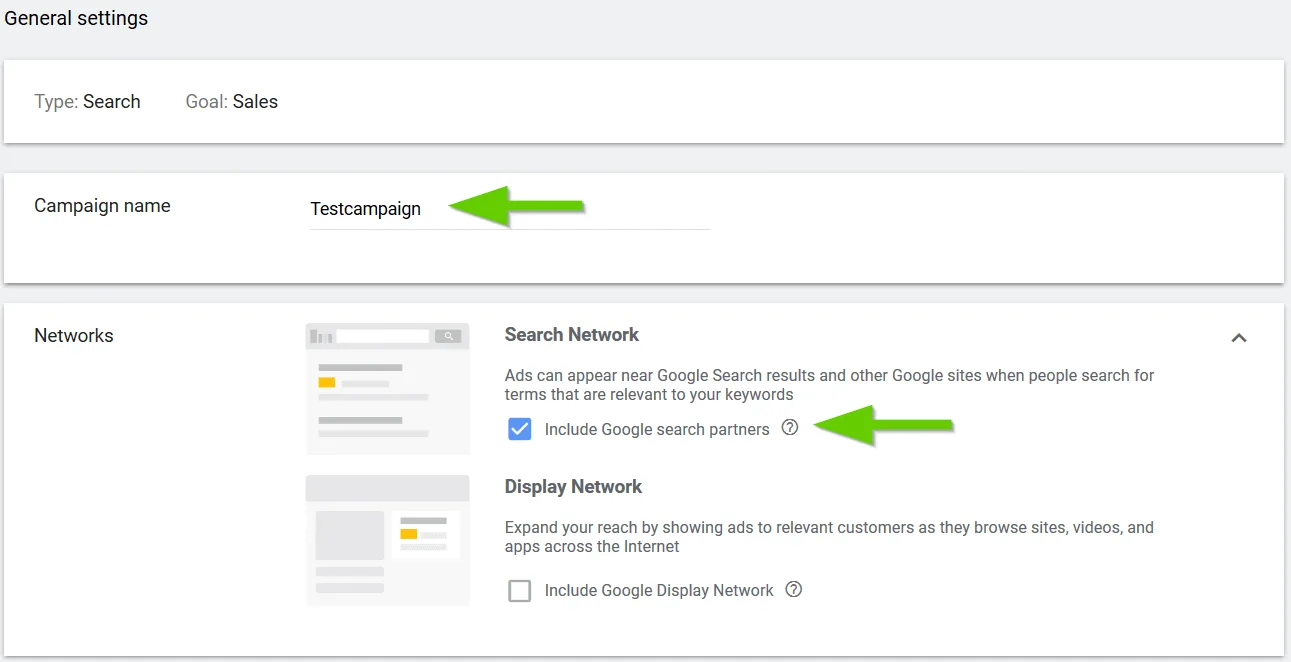
General campaign settings
In the general settings, enter the name for your campaign and select the appropriate advertising network. To get started with Google Ads, you should first start with the search network.
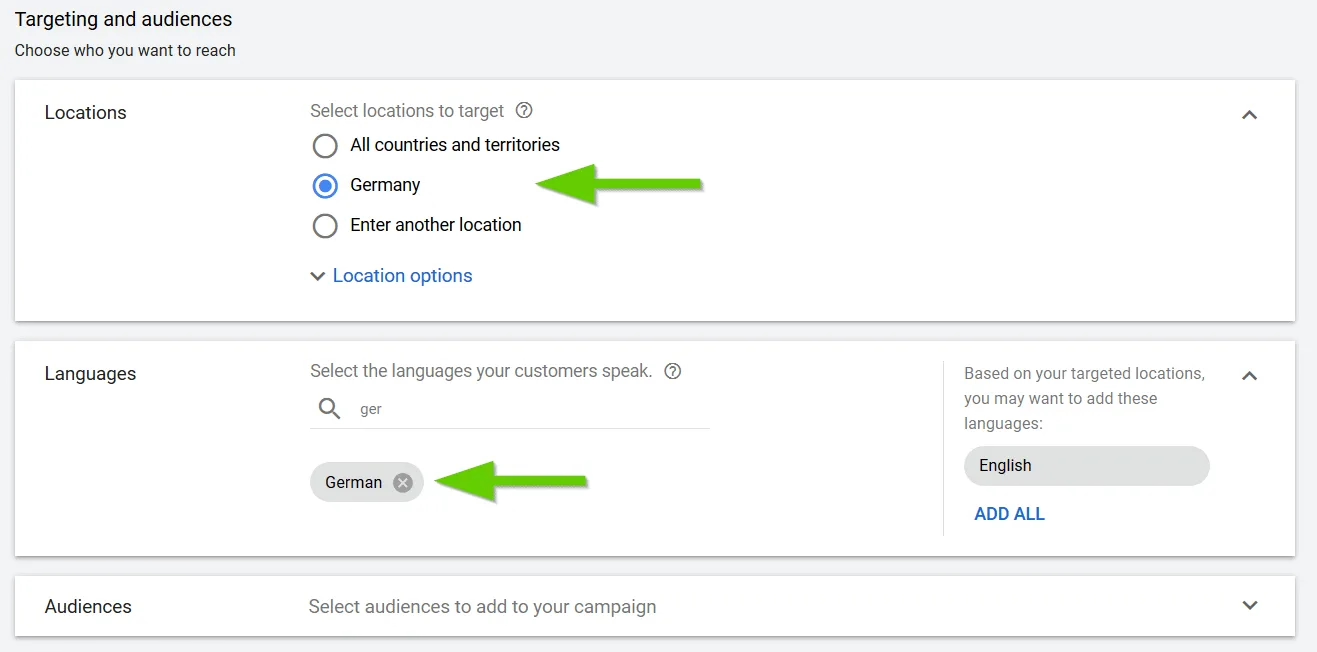
Orientation and target groups
In the targeting and target group settings, you specify the location and the languages in which the Google Ads should be displayed. If you want to advertise to a German target group, select “Germany” under Location and “German” under Language.
Budget and bid
You can set your daily budget in the budget and bids settings. Start here with an amount that is reasonable for you to begin with.
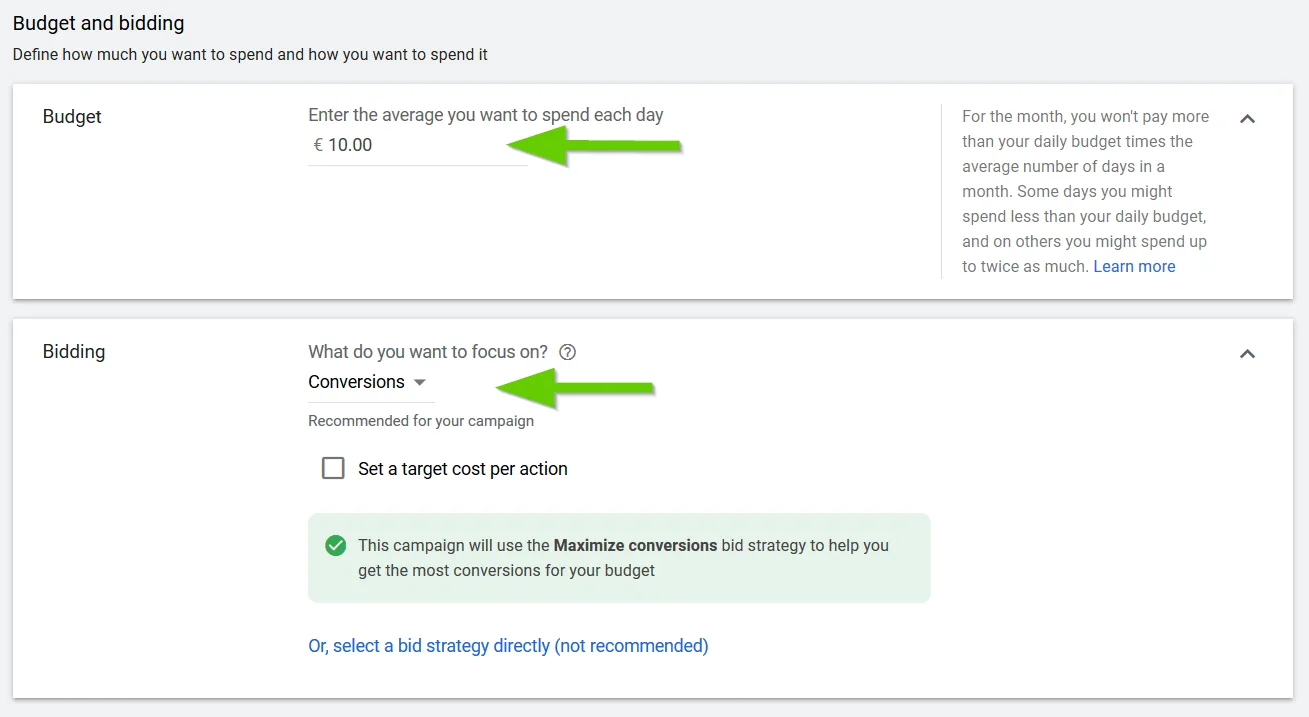
Under “Bids” you can set what you want to focus on. Here, for example, you can choose between conversion or clicks. We want to optimise our campaign for conversions, as we mainly want to generate visitors who take a corresponding action – in our case, a purchase.
Content marketing for advanced users: The 6 most important levers
Discover how to optimize your content marketing to reach the right audience, build trust, and achieve long-term success.
You do not need to set a target CPA at the beginning. You can deal with this when you eventually come to the various bidding strategies.
Set up ad groups
Under “Set up ad groups”, you now have the option of creating different keyword groups. In other words, if you use different keywords, it makes sense to assign them to different groups as well.
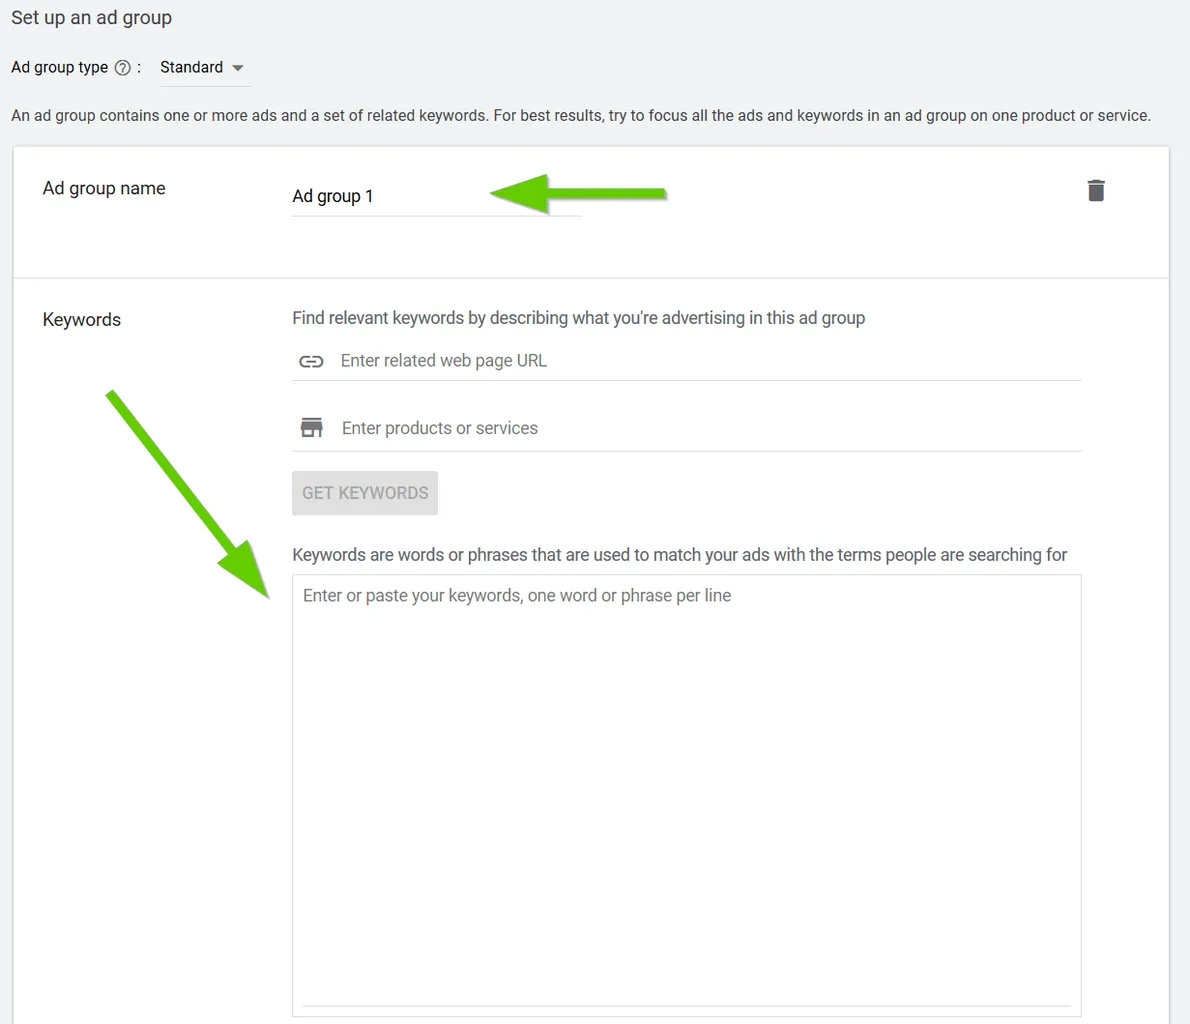
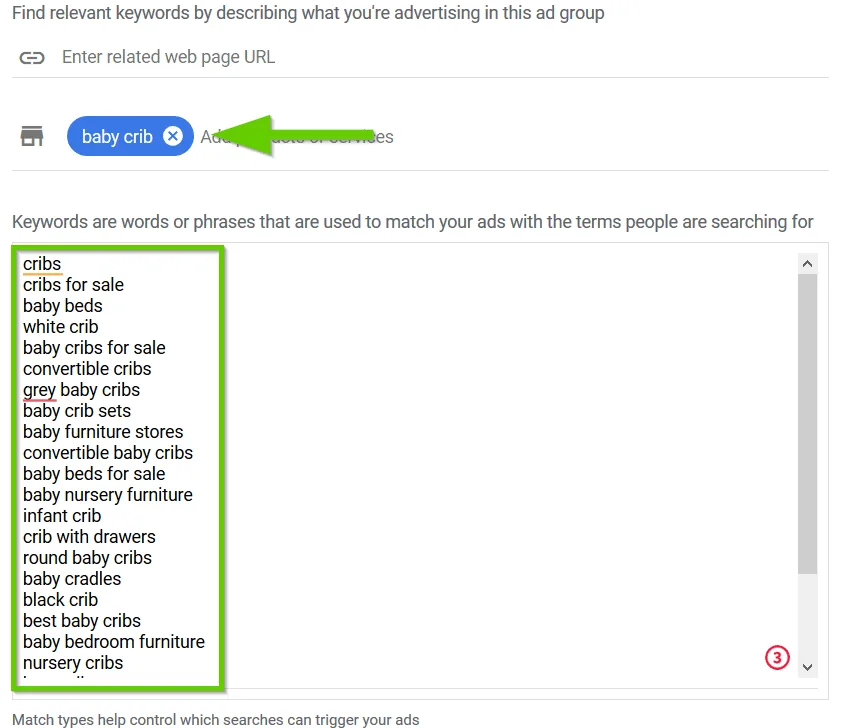
If you don’t want to add your keywords manually, you can use a URL or a product or service to have Google Ads generate a large number of interesting keywords.
For example, I have entered “baby cot” as the product here. You will then be shown a series of relevant keywords, which you should always look through or check again. For example, you could also enter the URL of your competitors here and AdWords would also display all relevant keywords for the URL. Or you could simply enter your keywords in the field, which you have previously determined using keyword research.
In our case, for example, it would make sense to put the terms “baby bed”, “cot” etc. in different groups.
Create advert
Under “Create advert”, you must now enter the Google Ads texts that will ultimately be displayed on the search results pages. You can also create several or more adverts for an advert group using the “Create next advert” button below.
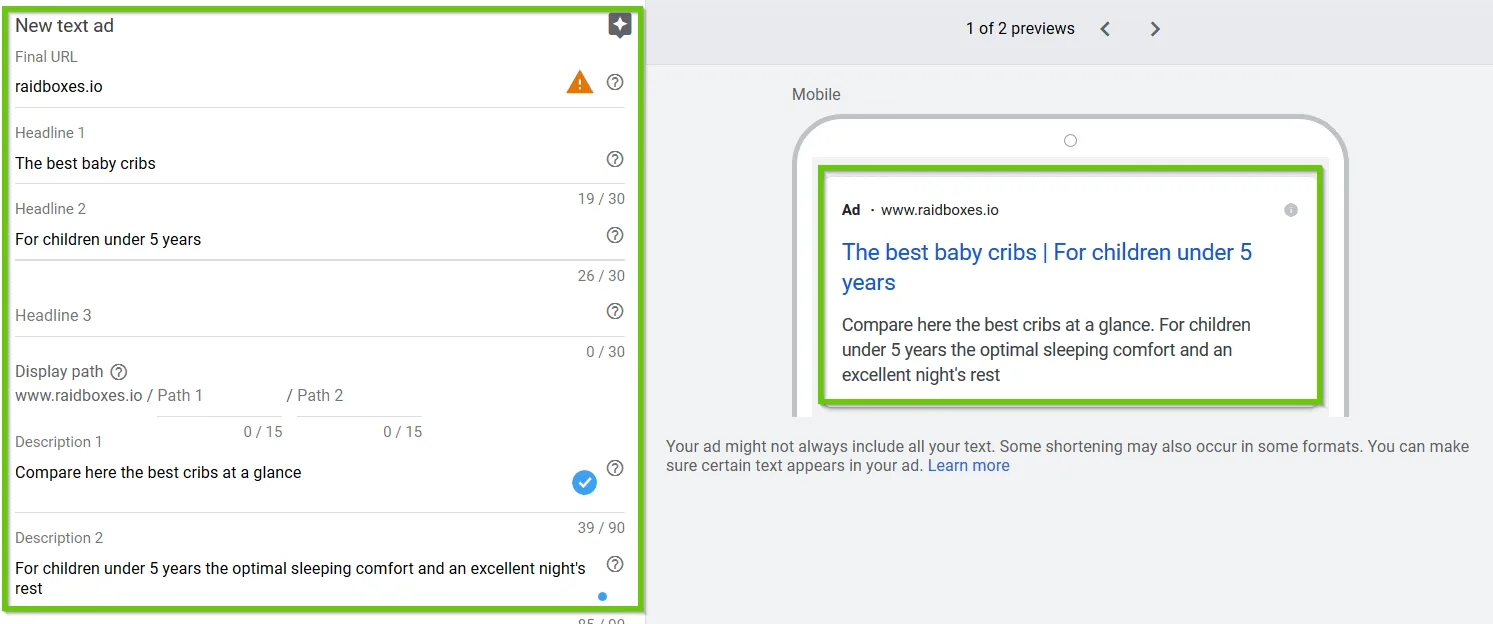
New text display
Here you now have the option to finalise the display. On the left-hand side you can make your entries and on the right-hand side you can directly see a preview for the output on desktop devices and smartphones.
In addition to the URL that you enter here and to which your users are redirected when they click on the Google Ad, you enter a corresponding ad title and descriptions. AdWords has a limited number of words for each line. You must therefore try to communicate the most important information briefly and concisely within the Google advert.
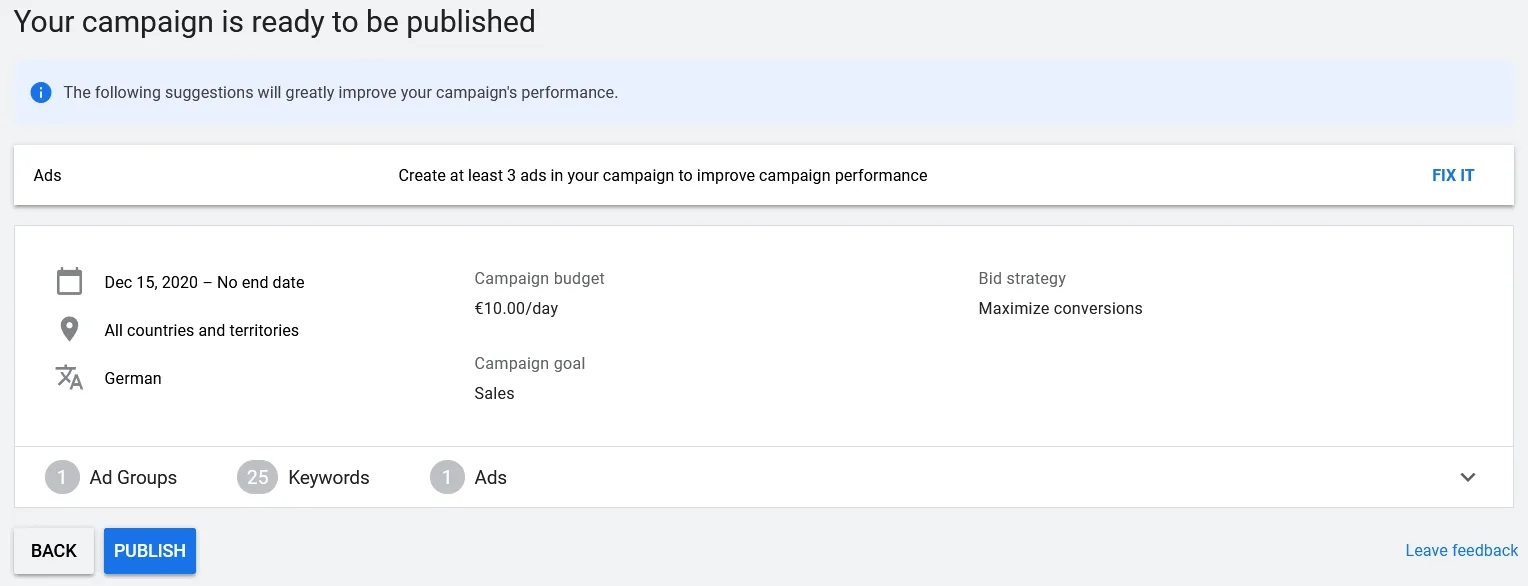
Review
You will then see a summary of your Google Ads campaign. This includes the start and end date, the campaign budget and the bidding strategy. Click on the “Publish” button to publish your campaign.
Google Ads Conversion Tracking
So that you can now also track whether and how many conversions you have achieved via the Google advert (sales), you must now integrate the so-called conversion event on your website.
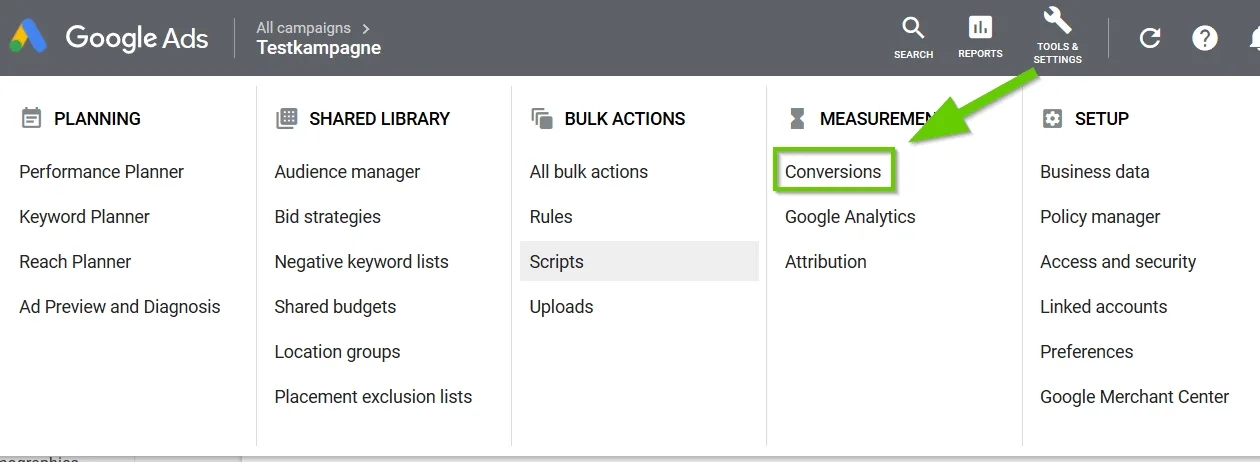
Then click on the “+” symbol to create a new conversion action.

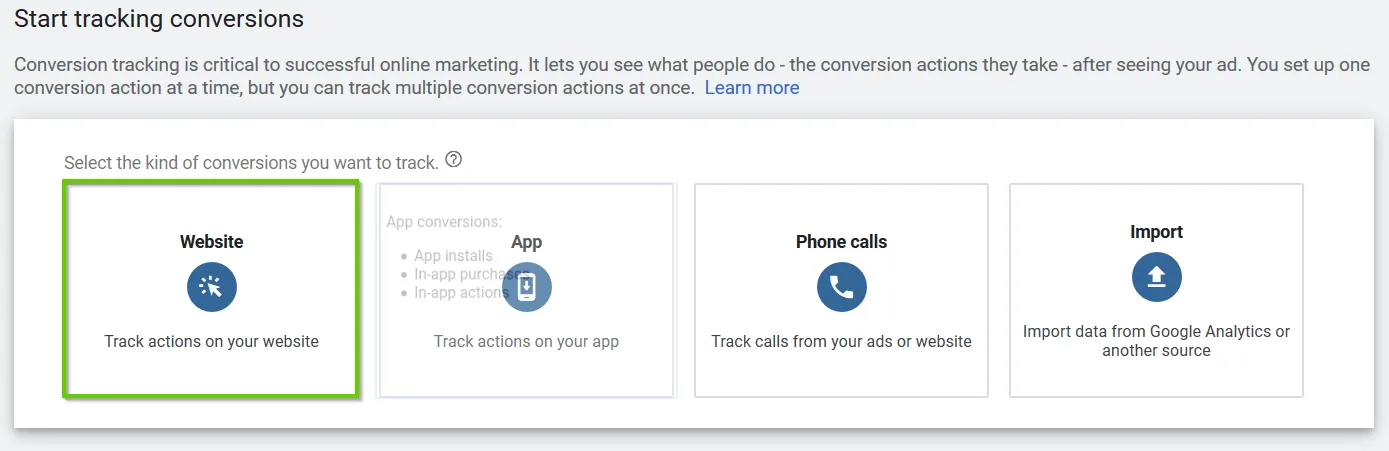
Create an action
In our example, we want to track the conversion on a website, so we select “Website” in the following view.
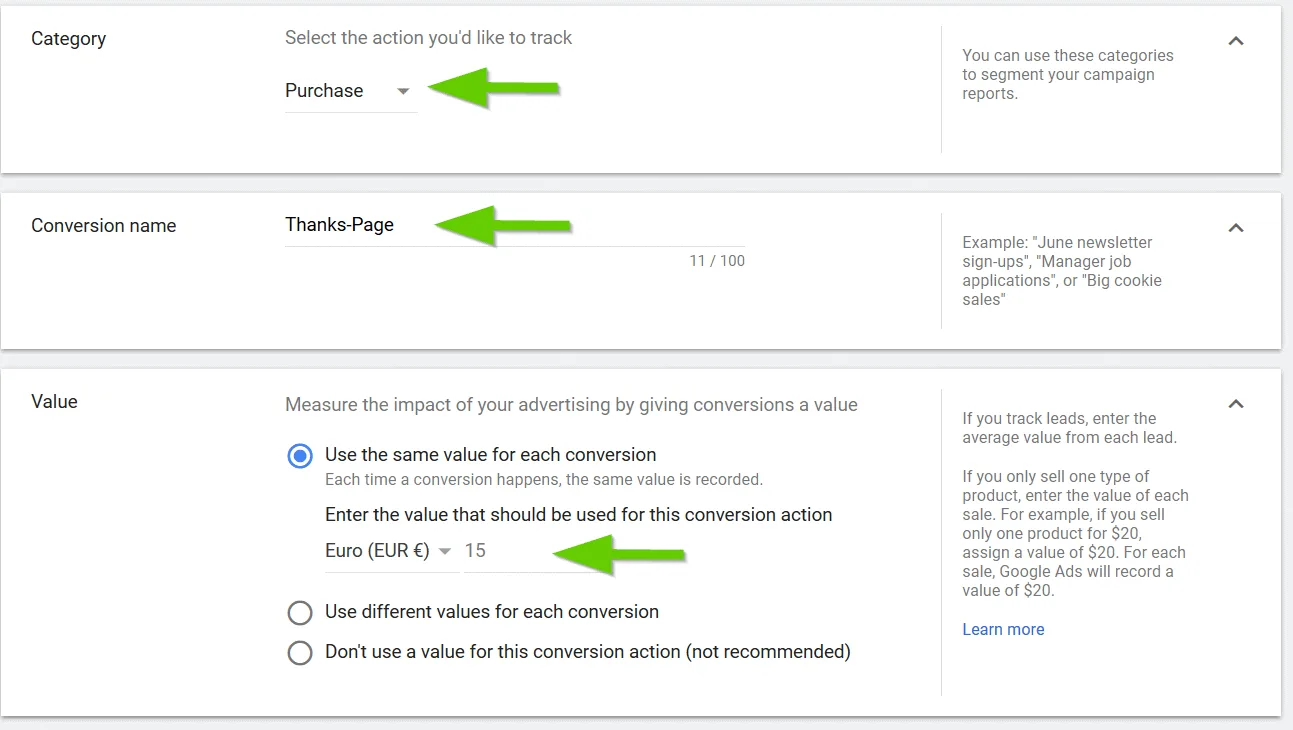
In the next step, you now define the settings for conversion tracking. Under “Category”, you need to specify which action you want to track. In our example, this would be the sale of a product.
You also assign a conversion name here, for example “Thank you page”. Under “Value” you can specify a value for the conversion. If you achieve 15 euros per sale, you would enter “15” here. This allows you to see directly in the statistics how much revenue you have achieved with this campaign.
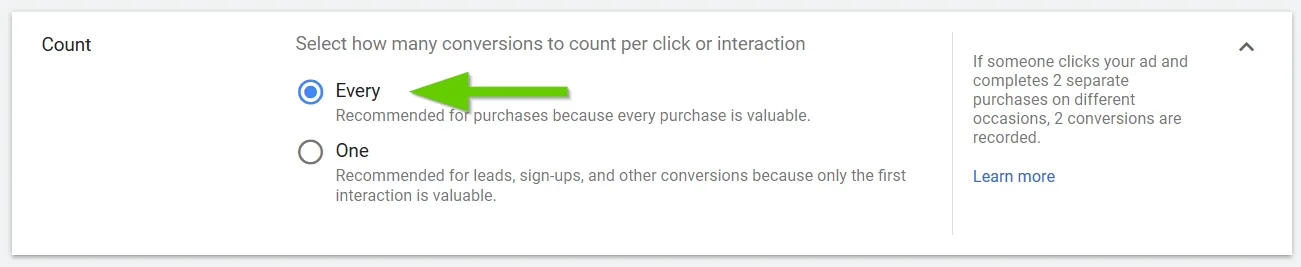
Under “Counting method”, you can specify how the conversions should be counted. For sales, you should select “All” here so that every purchase is tracked.
Set up day
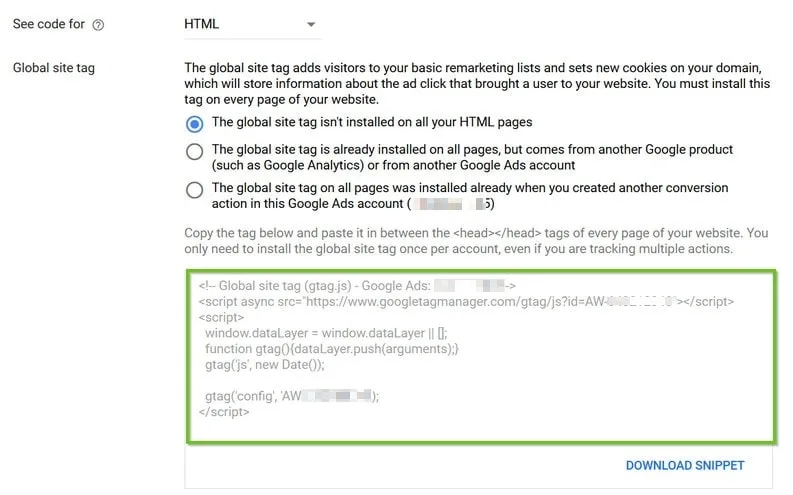
For the tracking to work correctly, you must first install the general tag. To do this, you can either simply copy the script and integrate it manually into your website or via Google Tag Manager if you are already using it.
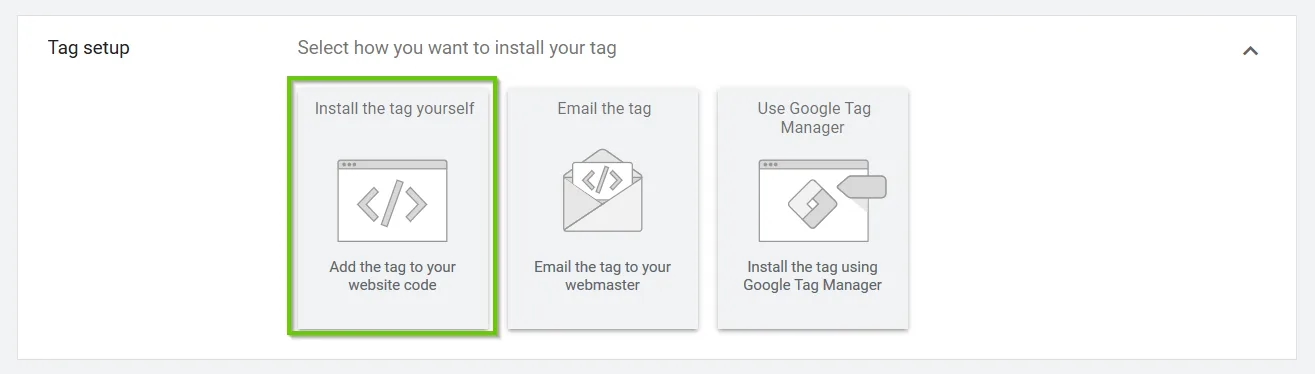
Click on “Insert tag yourself” to open the following view. Here you can copy the script directly by clicking on “Download snippet“. You then need to integrate this script into the source code of your header. The easiest way to do this is with a plugin such as Insert Headers and Footers.
So that you can now track the conversion or purchase correctly, you now need to add the “Sell event” that you previously created in Google Ads to the corresponding page – for example the thank you page.
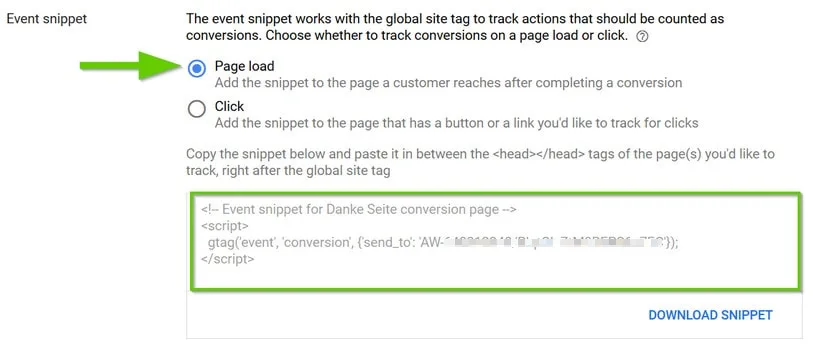
We leave the settings as they are, because the event should fire as soon as the page is loaded. You can also simply copy the event snippet by clicking on “Download snippet“.
However, you may only insert this snippet on the “Thank you page”. You can also use the plugin mentioned above for this and make the appropriate settings.
GDPR and Google Ads
As you probably already know and have read several times, the General Data Protection Regulation (GDPR) is on everyone’s lips. For you, this means that you should of course take into account the current laws and guidelines for tracking your Google Ads campaign.
What do I mean by that? In principle, you are only allowed to track visitors if they have given their consent in advance via a corresponding cookie banner. You can use a cookie plugin such as Borlabs Cookie, which I have already described in detail here.
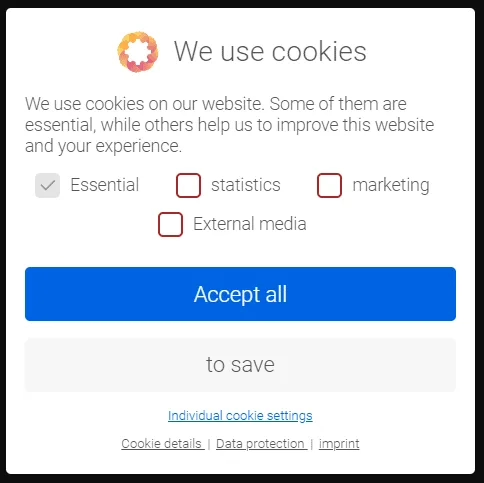
In this case, you simply create a corresponding cookie for the Google Ads script and insert the code here. You can also insert the event script on the corresponding page via the meta boxes (for example, the thank you page) so that the event is only actually fired when someone has agreed to the cookies.
Subscribe to the Raidboxes newsletter!
We share the latest WordPress insights, business tips, and more with you once a month.
"*" indicates required fields
Conclusion
Google Ads are a fantastic way to quickly and easily advertise products or services within Google search results. In today’s article, I have used the basic functions to show you how you can start your first campaign in no time at all.
However, Google AdWords really does offer numerous and advanced functions for creating campaigns, which I have deliberately left out here. So if you decide to switch to your first Google Ads as a beginner, I recommend that you familiarise yourself with Google advertising over a longer period of time. Start with a low budget and then slowly work your way up. The same applies here as with Facebook Ads – you have to test, test, test! It is important that you learn how Google Ads works, otherwise you will burn a lot of money, to put it bluntly.
I wish you every success in creating your first Google Ads campaign and maximum success!
Leave a Reply